Saturday, December 31, 2011

Blue Days

We're moving forward and finally reached the blue section of the deployment chain. I'm so happy to be into a different color knowing that it's closer to us being reunited.

I want to wish everyone a fun, happy, and safe New Years! Unfortunately my New Years kiss at midnight will be off by half a year, but that's alright because the longer the waiting, the sweeter the kiss.

Saturday, December 24, 2011

Hi


  • Classes have been finished for a little over 2 weeks. I got A's in my courses, still 4.0 GPA! 
  • I'm enrolled for two other courses for the Spring semester
  • Matt is in Singapore currently and he's enjoying being on land and seeing new places
This Christmas is our first Christmas apart in 7 years since being together. It definitely doesn't feel the same without him and it's my first spending it alone. I'm glad I have a couple craft projects in mind! I hope that everyone enjoys their Christmas being spent with family and friends. 

Saturday, December 17, 2011

Paper Bag Stockings

This final project I made in my husband's Christmas package was very simple to do.

What you need:
Brown paper bag
Scissors
Tape
Googly eyes
Hot glue gun/glue
Buttons
Candy Canes
Stocking Stuffers/candy

What you do:
Take the brown paper bag and cut 2 slits in the middle of the bag about same distance apart.

Insert the candy cane through the hole and then stand the paper bag up so you can tape the candy cane down in place so it doesn't move around. If you like, you can even hot glue the candy cane down for this part instead of tape.
Once that's finished, just put some items in there just as you would a stocking. Fold the bag over and tape it closed.
Reindeer stockings, too cute.
If you missed the other holiday craft posts, they are here, here, here, and here.

Thursday, December 15, 2011

Mini Tree Skirt

Today's post is all about making the Christmas tree a bit fancier by adding a tree skirt. In my hubby's care package, I added in a small tree, lights, decorations (Tree and non-tree related), tree skirt, a star, and mini candy canes so that their work center could celebrate the season right! The stores did sell tree skirts,  but they were $5-7 and since I figured that it's cheaper to make and pretty simple, I took a trip to Joann's.

What you need:
9x12 felt square
Cute trim/Ric-Rac
Hot glue gun/hot glue sticks
Scissors
Marker

What you do:
First take your felt square and draw a circle as big or small you feel like it should be to match the size of your mini Christmas tree.
Next step, cut along the line of where you drew your circle. Then make a slit almost halfway through the middle of the circle. This slit is so you can wrap it around the tree.
The circle doesn't have to be exactly perfect because we are adding on cute ric-rac to make it more festive, but you want it pretty even. Now, start hot gluing on the ric-rac along the edge of the border starting from one end of the slit until you reach the other side.

That's it! Isn't is so pretty? And just because, I added a few angle pictures of how it looks with a mini Christmas tree.


(Don't mind the background mess, It's the only way I can really work on Matt's care packages lol)

Tuesday, December 13, 2011

Frosty The Snowman

If you guessed this post has something to do about a snowman from reading the title, then you are correct! This is the continuation of crafts made for my hubby's care package for Christmas.

Now, if you love chocolate, snowmen, and quick/easy crafts, then this is one project for you to do!

What you will need:
Socks (you'll see why)
Ribbon
Tape
White paper; computer paper is best
Hot glue gun and hot glue sticks
Buttons
Crayons or markers
Hershey chocolate bars

What you do:
The first step to this project, is cutting the white paper to the correct length of the Hershey chocolate bar.
Lay the paper down and place the chocolate bar in the middle of the paper. Fold over half the paper and tape it to the chocolate bar. Then fold over the other paper and tape that down.


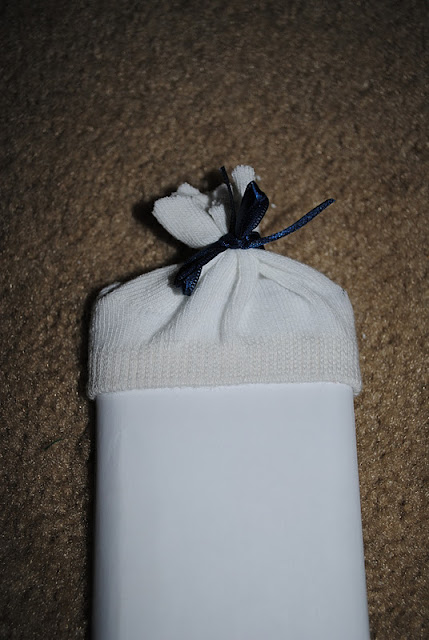
Once you have those steps completed, go ahead and now cut a piece off from the sock by starting on the ankle part of the sock, then working your way down. You can cut it to your desired length, but to show you how much I cut off, you can see from the picture below

Place the cut part of the sock on the top part of the bar and hot glue the bottom portion of the sock to the paper that way it doesn't slip off. Bunch up the top part of the sock and tie a pretty bow around it. It's already looking much more than a snowman!
Draw on the eyes, nose, and mouth. Then hot glue on buttons. (you can use 2, 3, 4 buttons) That's it. You have a cute chocolate snowman!  

Monday, December 12, 2011

You're A Mean One, Mr. Grinch

Matt finally got his care packages!! Oh how we both were anxiously waiting for him to receive them.
Now..to continue with the crafts made for hubby's Christmas care package. I decided to make these "Grinch pills" so him and a few other guys he works with can take one whenever they are feeling out of the spirit.

What you will need:
Green mints (I couldn't find green tic tacs anywhere, so I had to settle with green/white mixed)
Ribbon
Paper
Scissors
Glue
Hole puncher

What you do:
 To start off with, cut out a piece of green scrapbook paper so that it is bigger than the mint case, length and width.

Then you want to fold that paper in half and take the scissors to the corner edges and cut at an angle and then turn them upward so it forms the shape of an open book. Pictures shown below:


Punch a hole so it's aligned in the middle of the paper near the end opening, then paste on your label of the "Grinch pills" and put the mints in between the paper. Loop the ribbon through the holes you made and tie it off!


Cute, right?

Side note: Like I wrote before, I mailed extras in the package so that his co-workers and friends were able to enjoy the holiday spirit just in case they weren't receiving anything else from anyone back at home. It's hard enough to be separated from loved ones, let alone to not have anything. No way on my book that was happening! What I was NOT expecting though, was getting an e-mail from one of Matt's co-worker/friend saying thank you and that it meant a lot. Ah, the warm feeling of goodness it brought to my heart.

Saturday, December 10, 2011

Blog Makeover

December is going by fairly quickly already. I find that I'm always having something to do and now I need to really concentrate for my finals that are coming up in a few days. 
Since I took the executive decision to not decorate the house this year for Christmas (bah humbug lol) I figured I should at least redesign our blog to make it more in the Christmas spirit. I'm still on the fence of even mailing out Christmas cards!

Things are going fine over here in California. I would post more of the crafty stuff I added in Matt's Christmas package but he has not received it yet (I know, right!) so until he does, I won't be adding any more just in case he reads this.
And speaking of that handsome guy, Matt is doing fine too. He's somewhere in that large ocean working. Not too much he can do since he's stuck on a ship,  but I think he is trying to make the best of it. Still no phone call or letters, but at least he has an e-mail account he can access. The only thing that I like better about the MEU than land deployments is that there is more updates on where they are and pictures posted from the actual ship. So it's always nice to read about and see pictures.

Friday, December 2, 2011

Rudolph Noses

I love making care packages for Matt while he is deployed. It allows me to bring out my fun, crafty, and artistic side of me. I love making a theme for each individual package and I know he loves opening each one!  Well, since Christmas is coming up and we have to be apart for the holiday, I decided to bring Christmas to him via care package. I thought about almost everything I could that could help bring the holiday season to him. I still have 1 more package to mail out in the next couple of days that he can enjoy.
With that being said, I decided to share some of the crafty projects I included in the package. To start out, here is a simple gift idea that you can do: Rudolph Noses

What you will need:
M&M's red and green will work, or if you want to use red hots instead. (It's totally up to you and what you think the person would prefer).
Small glass jar with a lid, or a cute Tupperware container
Ribbon
Label
Hot Glue

So, this is really simple project that I felt step-by-step pictures wasn't necessary.

What you do:
Fill up your jar/container.
Tie a pretty ribbon around the lid part. Apply hot glue underneath to keep the ribbon from slipping down or moving.
Glue on the label on top of the lid or side of the jar. I wrote in that it contains "red and green noses" but you don't have to write that.

And that's it! It's finished and cute. You can make your own label. Since I'm not the greatest drawer, I figured it was best for me to just find a picture of a reindeer online!


Hopefully hubby doesn't get on and read this! He hasn't received his package yet... hopefully soon though!

Thursday, December 1, 2011

We're In The Greens!

Well, the first half of the greens. I made a deployment paper chain and showed/talked about it in this post.
The chain has two greens, one closer in the beginning of the deployment and one near the end of the deployment.  Although, I would love to say it was the latter of the two, unfortunately it's not.  But, a positive is.. we're out of the browns and now into the greens. I love waking up each morning to take off a chain and see how much shorter it gets. I actually just took a green off this morning since it's now December.

P.S. This post marks the 100th post since February when I first started this blog.

Cross It Off

So, I haven't yet written about what Matt and I did during his leave before he deployed or even a few weeks before then, but we actually have been crossing things off our list without even realizing it. It's actually fun to see how much we have accomplished this year since we wrote it out.

We took a hike around Lake O'Neil. It is just right on base, but it's scenic with all the trees around. They actually host racing events throughout the year there. Part of #49
Well, we did go to Vegas again (4th time)! We went during his leave and enjoyed ourselves. We were able to see two shows. The Peepshow with Holly Madison (which was awesome!!) and Cirque Du Soleil Mystere.  They both were great shows. So, that was #21 on our list. Hopefully when he gets back home, we will know whether or not when or where we will be moving to.
Oh, and while in Vegas, we got a couple's spa! I totally recommend getting one even if you're ticklish because I am so ticklish but after 5 minutes, it didn't phase me anymore. This was my first massage and it was heaven. I loved every minute of that hour! Matt enjoyed his too, this was his second. We both had a nice time in the spa. That was #60
(Unfortunately, we didn't take many pictures in Vegas)

We went to the shooting range. I think this time, Matt shot better than me unlike our last visit. Those brand new corrected eyes of his! Either way, we really had fun with that. I always walk out of there wanting to do law enforcement, but I don't think that will ever happen. #35


During his last month home, we also managed to: go to the movies (a lot), miniature golf, bowling, pumpkin patch, rock climbing, and Seaworld (we can get in for free 1 time every year). A few pictures are posted below.


 Not too many pictures of Seaworld due to camera battery died.